
Attic Condensation, Ice Dams or Roof Leaks? How To Identify & Fix Winter Leaks
Winter Roof Leak and Attic Condensation Tips - Central Ohio Roofers
Dealing with attic condensation, ice dams or roof leaks? With any leak, determining the type of leak and its source is vital to finding a solution. In this article from your favorite Central Ohio roofers, we’ll cover how to distinguish between the three types of leaks, what causes each, and how each can be prevented or repaired. Early detection can save you a lot of time, money, and hassle when it comes to keeping a healthy roof.
Leaks Due To Attic Condensation
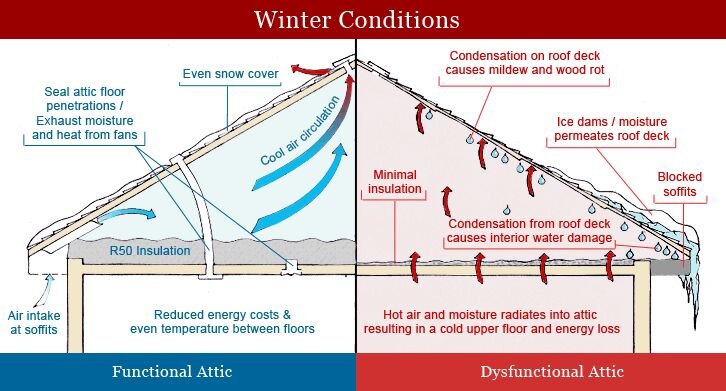
The first type of leak is caused by the accumulation of condensation in the attic. While it’s possible for condensation to occur in warm weather, it’s much more common for it to appear in environments where temperatures can dip below 35℉ for long periods of time like they do here in Central Ohio. This is a big reason local roofing companies experience such an influx of attic condensation related calls during the winter. It’s especially easy to confuse condensation issues with an actual leak during the winter, as temperature fluctuations encourage the formation of condensation.
The extremely cold temperatures during winters in Ohio cause frost to form underneath the roof sheeting (also known as the attic roof). This frost typically builds up above light fixtures, bathrooms, stoves, or other sources of heat. When it melts, the effects can mimic a leak. By reducing (ideally eliminating) the amount of air leaking into the attic, this can be avoided.
So, what exactly is condensation? To put it simply, condensation is the result of having too much moisture is in the air for the temperature. When moist, warm air comes into contact with anything colder than the dew point of that air, it must release moisture in order to adapt to the new, lower dew point. This moisture is released in the form of water, causing water droplets to appear on the colder surface.
Typically, you’ll notice condensation first on your windows, as a result of excess humidity in your home. However, it’s likely that this excess humidity is causing damage you can’t see in places such as your walls and floors. This moisture can cause peeling paint, mildew and mold buildup, and rotting wooden floors.
There are several sources in your home that release a significant moisture into the air on a daily basis. You may never have thought about it before, but even just a person’s normal breathing and perspiration add a whole three pints of water to the air every day. That’s not to mention cooking, doing laundry, taking showers, and washing dishes.
Today, new homes are being built better insulated and tighter than ever. But for older homes, especially in the winter, condensation can be a serious problem. Remember that both insulation and ventilation must be addressed in order to allow moisture to escape. Below are a few steps you can take to reduce the amount of humidity in the air.
One of the most important things you can do is to consider installing exhaust fans (also known as dryer vents). These fans, whether in the kitchen, bathroom, or laundry room, can play a huge role in maintaining a balance of moisture in the air. Pay attention to where these exhaust fans are discharged. They should always discharge outside – never into the attic. Even if your attic space is adequately ventilated, condensed water vapor will begin to freeze onto anything cold in the attic.
Additional roof vents can make a big difference. Whether box vents, turbine vents, or ridge vents, they will allow the warm air to escape the attic, therefore eliminating condensation issues. Note that with new roof vents you’ll also need new soffit vents.
Ventilate the basement or crawl space. This can be as simple as cracking a basement window open in the fall or early winter.
Invest in a dehumidifier. These are especially helpful for homes with vaulted roofs.
Open the fireplace damper.
Leaks Due To Ice Dams
The second type of leak we deal with a lot during the winter occur as a result of ice dams. Ice dams are chunks of ice that form at the edge of a roof, preventing water (melted snow) from draining off. As a result, water backs up behind it, trapped. This water leaks into the home, wreaking havoc on walls, ceilings, and anything else it comes in contact with.
If you’re trying to reduce ice dams, reducing the amount of warm air leaking into the attic is a great start. When enough of this warm air reaches the attic, it can melt snow on the roof, leading to an icy, glacier-like buildup. Removing snow from the roof is an option, too, but it must be done before it turns to ice. Ice dams are not a workmanship-related issue. Below are a few more suggestions for preventing ice dams:
Minimize heat sources in the attic.
Clean out downspouts and gutters before the snow comes.
When the outside temperature in the low 20’s, keeping the attic air temperature below freezing has been shown to reduce the formation of ice dams.
Make sure ice guard underlayment is installed correctly and to code next time the roof is replaced to ensure prevention of leaks showing up on exterior walls.
Removing an existing ice dam can be dangerous, so it’s advised to contact a professional.
Leaks Due To Exterior Roof Damage
The third type of leak occurs when water begins leaking through the roof system when it’s raining. This is your “typical leak,” and is probably the type you think of when you think of a roof leak. This is often the result of faulty shingles, poor flashing details, or damaged window sills. Typically, these external leaks are easily repaired by a quality roofer.
In an emergency situation, there are some steps you can take before your roofing contractor arrives. Locating the leak is key. Sometimes, this can be more difficult than you’d think! After you find the source, you have a couple temporary repair options:
Using a tarp to cover your roof works as well, so long as it is sturdily held down or stapled to the roof.
Poking a small hole in the center of the bowing portion of a ceiling if it’s wet or soft to the touch to relieve pressure from water trapped in the ceiling. A nail or small screwdriver works best. This can help prevent a ceiling from caving in.
Inside, using a bucket or garbage can to collect water.
Laying down drop cloths on the floor can help prevent damage to the carpet and flooring.
We hope this information proves beneficial in helping you identify the different types of roof leaks and how to deal with each. Whether the underlying cause is condensation, ice dams, or simply exterior damage, it’s important to address the issue as soon as possible to prevent larger, more expensive problems. A roofing contractor can perform an inspection for you to ensure there is no existing damage or areas that are particularly susceptible to damage. Feel free to contact us today if you need help or have questions!